Cheesy Garlic Chicken Wraps
- Prep Time: 10 minutes
- Cook Time: 15 minutes
- Total Time: 25 minutes
- Yield: 4 wraps 1x
- Category: Lunch
Description
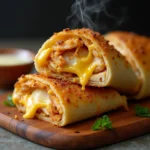
These Cheesy Garlic Chicken Wraps are packed with juicy, seasoned chicken, melted cheese, and a garlicky, buttery crunch. Wrapped in a warm tortilla and toasted to perfection, they make for a quick and satisfying meal, ideal for lunch or dinner. Serve them with a side of dipping sauce for extra flavor!
Ingredients
For the Chicken:
- 2 boneless, skinless chicken breasts, diced
- 1 tablespoon olive oil
- 2 cloves garlic, minced
- 1 teaspoon onion powder
- 1 teaspoon paprika
- ½ teaspoon salt
- ½ teaspoon black pepper
- ½ teaspoon Italian seasoning
- 1 tablespoon butter
For the Wraps:
- 4 large flour tortillas
- 1 cup shredded mozzarella cheese
- 1 cup shredded cheddar cheese
- 2 tablespoons melted butter
- 1 teaspoon garlic powder
- 1 tablespoon chopped fresh parsley (optional)
Instructions
Cook the Chicken: Heat olive oil in a pan over medium heat. Add diced chicken and season with garlic, onion powder, paprika, salt, black pepper, and Italian seasoning. Cook for 5-7 minutes until chicken is golden and cooked through. Add butter and stir to coat. Remove from heat.
Assemble the Wraps: Lay a tortilla flat and sprinkle a mix of mozzarella and cheddar cheese over one half. Add cooked chicken on top, then fold the tortilla in half. Repeat with remaining tortillas.
Toast the Wraps: In a small bowl, mix melted butter with garlic powder. Brush the outside of each tortilla with the garlic butter mixture.
Cook the Wraps: Heat a large skillet over medium heat. Place wraps in the pan and cook for 2-3 minutes per side, pressing down lightly, until golden brown and crispy.
Serve: Remove from heat, sprinkle with fresh parsley (if using), and slice in half. Serve with your favorite dipping sauce, such as ranch or garlic aioli. Enjoy!
Notes
- Add sliced jalapeños or red pepper flakes for a spicy kick.
- Swap out mozzarella for pepper jack if you want extra flavor.
- For a healthier version, use whole wheat tortillas and low-fat cheese.
Nutrition
- Serving Size: 1 wrap
- Calories: 450 kcal
- Fat: 22g
- Carbohydrates: 35g
- Protein: 30g
Introduction
If you’re looking for a quick, flavorful, and satisfying meal, cheesy garlic chicken wraps are the perfect choice! These wraps combine tender, juicy chicken with gooey melted cheese and a rich, garlicky sauce, all wrapped in a warm tortilla. Whether you’re making lunch, dinner, or a grab-and-go snack, this recipe is easy to prepare and packed with flavor.
In this guide, you’ll learn how to make the best cheesy garlic chicken wraps from scratch, including the perfect garlic sauce, cheese options, and cooking methods for a crispy, golden-brown finish. Let’s get started!
For another delicious protein-packed meal, check out this Perfect Salmon Bowl, a healthy and flavorful option that’s just as satisfying!
Ingredients for Cheesy Garlic Chicken Wraps
Essential Ingredients
To make these delicious wraps, you’ll need a few simple ingredients.
For the Chicken:
| Ingredient | Purpose |
|---|---|
| 2 boneless, skinless chicken breasts (or thighs) | The main protein, juicy and flavorful. |
| 1 teaspoon salt | Enhances the natural flavor of the chicken. |
| ½ teaspoon black pepper | Adds mild spice and depth. |
| 1 teaspoon paprika | Gives a mild smoky flavor. |
| ½ teaspoon onion powder | Adds subtle sweetness. |
| 1 teaspoon Italian seasoning | Brings out a savory, herby taste. |
| 1 tablespoon olive oil or butter | Helps with browning and adds moisture. |
💡 Tip: For extra flavor, marinate the chicken in the seasoning for at least 30 minutes before cooking.
For the Garlic Sauce:
| Ingredient | Purpose |
|---|---|
| 3 tablespoons butter | Creates a rich, creamy base. |
| 4 cloves garlic (minced) | Adds bold garlic flavor. |
| 1 teaspoon flour | Thickens the sauce slightly. |
| ½ cup heavy cream or milk | Makes the sauce smooth and creamy. |
| ¼ cup grated Parmesan cheese | Adds salty, umami richness. |
| ½ teaspoon dried parsley (or fresh parsley, chopped) | Gives freshness and color. |
💡 Tip: If you love a spicy kick, add a pinch of red pepper flakes to the garlic sauce.
For Assembling the Wraps:
| Ingredient | Purpose |
|---|---|
| 4 large tortillas (flour or whole wheat) | Holds everything together. |
| 1 cup shredded mozzarella cheese | Creates a gooey, stretchy texture. |
| ½ cup cheddar cheese (optional) | Adds extra sharpness and depth. |
| ½ cup fresh spinach or lettuce (optional) | Adds crunch and freshness. |
| 1 tablespoon olive oil or butter (for cooking) | Helps crisp up the tortilla. |
💡 Tip: For a healthier version, use low-carb or whole wheat tortillas.
How to Make Cheesy Garlic Chicken Wraps
Step 1: Cooking the Chicken
- Season the chicken – In a bowl, coat the chicken with salt, pepper, paprika, onion powder, and Italian seasoning.
- Cook the chicken – Heat olive oil or butter in a pan over medium heat. Cook the chicken for 4-5 minutes per side until golden brown and fully cooked (internal temperature: 165°F (74°C)).
- Rest and slice – Let the chicken rest for 5 minutes, then slice it into thin strips.
💡 Tip: Want to save time? Use pre-cooked rotisserie chicken instead!
Making the Garlic Sauce
- Melt butter – In the same pan, melt 3 tablespoons of butter over medium heat.
- Sauté garlic – Add minced garlic and cook for 30 seconds until fragrant.
- Thicken the sauce – Stir in flour and cook for another 30 seconds.
- Add cream and cheese – Pour in heavy cream, whisking constantly, then add Parmesan cheese and parsley.
- Simmer until smooth – Cook for 2 minutes, stirring until the sauce thickens. Remove from heat.
💡 Tip: If the sauce gets too thick, add a splash of milk to thin it out.
Assembling the Wraps
- Lay out the tortillas – Place a tortilla on a clean surface.
- Layer the fillings – Add mozzarella cheese, sliced chicken, and a generous drizzle of garlic sauce. If using, add cheddar cheese and spinach/lettuce.
- Wrap it up – Fold in the sides, then roll tightly from the bottom up.
💡 Tip: To prevent the wrap from falling apart, warm the tortillas slightly before rolling.
Cooking the Wraps (Crispy Option)
To make the wraps crispy and golden brown, follow one of these methods:
1. Pan-Seared (Quick & Easy)
- Heat 1 tablespoon of olive oil or butter in a skillet over medium heat.
- Place the wraps seam-side down and cook for 2-3 minutes per side until crispy and golden.
2. Oven-Baked (Healthier Option)
- Preheat oven to 375°F (190°C).
- Place wraps on a baking sheet and bake for 10-12 minutes, flipping halfway.
3. Air Fryer (Super Crispy)
- Preheat the air fryer to 375°F (190°C).
- Lightly spray the wraps with oil and air fry for 6-8 minutes, flipping once.
💡 Tip: For extra cheesiness, sprinkle some shredded cheese on top before baking.

Cooking and Serving Cheesy Garlic Chicken Wraps
Now that your cheesy garlic chicken wraps are assembled, it’s time to cook them to crispy, golden perfection and serve them with the best pairings. This part covers different cooking methods, how to store and reheat wraps, and expert tips to make them even more delicious.
Step 1: Cooking the Cheesy Garlic Chicken Wraps
Option 1: Pan-Seared (Quick & Easy)
This method gives your wrap a crispy golden-brown exterior while keeping the inside melty and flavorful.
- Heat 1 tablespoon of olive oil or butter in a skillet over medium heat.
- Place the wraps seam-side down in the skillet to seal them shut.
- Cook for 2-3 minutes per side, pressing gently with a spatula to ensure even crisping.
- Once golden brown and crispy, remove from heat and let cool slightly before slicing.
💡 Tip: Cover the pan with a lid for the first minute to help the cheese melt faster.
Option 2: Oven-Baked (Healthier & Hands-Free)
If you prefer a healthier option with less oil, baking your wraps is the way to go!
- Preheat oven to 375°F (190°C).
- Place the wraps on a baking sheet lined with parchment paper.
- Lightly brush the wraps with olive oil or melted butter.
- Bake for 10-12 minutes, flipping halfway through, until crispy.
💡 Tip: Add extra cheese on top in the last 2 minutes for an extra cheesy crust.
Option 3: Air Fryer (Super Crispy & Fast)
For a super crispy wrap with minimal oil, use an air fryer!
- Preheat the air fryer to 375°F (190°C).
- Lightly spray the wraps with cooking spray or brush them with olive oil.
- Place them seam-side down in the air fryer basket.
- Cook for 6-8 minutes, flipping once halfway through.
💡 Tip: Don’t overcrowd the air fryer—cook in batches if necessary to allow proper airflow.
Step 2: Serving Cheesy Garlic Chicken Wraps
Your cheesy garlic chicken wraps are now crispy, golden, and bursting with flavor! Here’s how to serve them:
Best Dipping Sauces
- Garlic Aioli – A creamy, garlicky sauce for extra richness.
- Spicy Mayo – Mix mayonnaise with hot sauce for a kick.
- Honey Mustard – A tangy-sweet contrast to the cheesy filling.
- Ranch Dressing – A classic favorite for dipping.
Perfect Side Dishes
Pair your wraps with these delicious sides:
✔ Homemade Strawberry Ice Cream – A refreshing, creamy dessert to balance the savory flavors.
✔ Sweet Potato Fries – Crispy, slightly sweet fries that complement the garlic and cheese.
✔ Coleslaw – A crunchy, tangy slaw to add freshness to your meal.
✔ Garlic Parmesan Roasted Vegetables – A healthy, flavorful side that matches the garlic theme.
Step 3: Storing & Reheating Leftovers
If you have extra wraps, don’t worry! They store and reheat well for quick meals later.
| Storage Method | How Long? | Instructions |
|---|---|---|
| Refrigerator | Up to 3 days | Wrap tightly in foil or store in an airtight container. |
| Freezer | Up to 2 months | Wrap individually in plastic wrap & place in a freezer bag. |
How to Reheat Cheesy Garlic Chicken Wraps
- Microwave (Quickest) – Heat for 1-2 minutes, covering with a damp paper towel to prevent dryness.
- Oven (Best for Crispiness) – Bake at 350°F (175°C) for 8-10 minutes until heated through.
- Air Fryer (Super Crunchy) – Air fry at 375°F (190°C) for 4-5 minutes.
💡 Tip: If reheating frozen wraps, let them thaw in the fridge overnight before reheating for best results.
FAQs About Cheesy Garlic Chicken Wraps
1. Can I use pre-cooked chicken instead of fresh chicken?
Yes! Rotisserie chicken or leftover grilled chicken works great. Just shred or slice it, mix it with the garlic sauce, and assemble your wraps.
2. Can I make these wraps ahead of time?
Absolutely! You can assemble the wraps up to a day in advance, store them in the fridge, and cook them when ready.
3. What’s the best cheese for these wraps?
Mozzarella gives the best stretch and melt, but you can also use:
- Cheddar for a sharper flavor
- Provolone for a mild, creamy taste
- Monterey Jack for a smooth melt
4. How can I make these wraps healthier?
- Use whole wheat or low-carb tortillas.
- Swap heavy cream for Greek yogurt in the garlic sauce.
- Use lean chicken breast and cook with minimal oil.
5. Can I add vegetables to the wraps?
Yes! Some great add-ins include:
✔ Sautéed mushrooms – Add a rich, earthy flavor.
✔ Spinach or kale – Boosts nutrition without overpowering the taste.
✔ Roasted red peppers – Adds sweetness and depth.
Conclusion
These cheesy garlic chicken wraps are the perfect meal for anyone who loves bold flavors, crispy textures, and gooey melted cheese. Whether you make them for lunch, dinner, or meal prep, they’re easy to whip up and always satisfying.
For more delicious recipes, check out:
- Perfect Salmon Bowl – A nutritious and protein-packed meal.
- Cajun Boil Party Guide – A seafood feast with bold and spicy flavors.
Try this recipe today and enjoy the ultimate cheesy, garlicky, and crispy chicken wrap!

Connect with us
Stay connected with us and discover delicious recipes by following Benny’s Recipes on social media! Join us on Instagram for mouthwatering food inspiration, like us on Facebook for the latest updates, explore our collections on Pinterest, and follow us on X for exciting tips and culinary ideas. Let’s make every meal unforgettable together!